To keep ones iPhone’s data safe and secure it is very important that one should regularly create iTunes backup. If you follow the proper process to create iTunes backup, not only will you be able to transfer all the data from one iPhone to another in a fraction of seconds but can also archive, extract and recover iPhone data whenever required.
Steps to Create iTunes Backup
- Using a USB sync cable, simply connect your iPhone to your computer.
- The iTunes window will automatically get launched on your computer screen as you connect your iPhone. However, if the iTunes window doesn’t appear, click on the iTunes icon to open it manually.
- Click on the iPhone icon as it appears in your iTunes window.

Select iPhone from iTunes
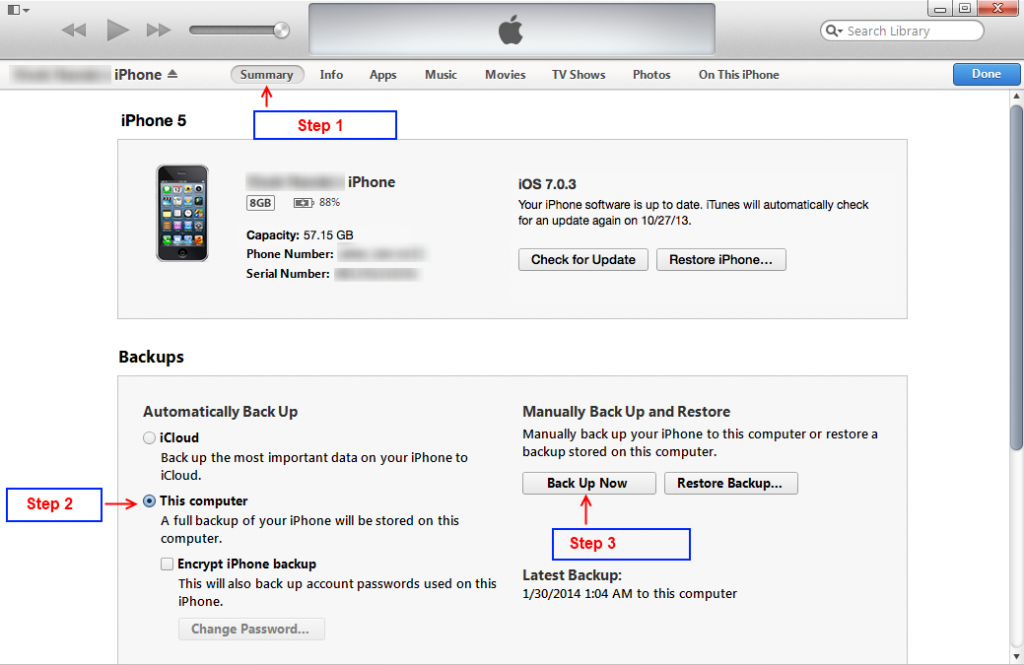
- Select the summary tab to view the details of your iPhone and the data within. (Step 1 from image shown below)
- Under the Backups section, click on ‘This Computer’ option where it says ‘Automatically Back Up’. For reference, view ‘Step 2′ as shown in the image below.
- Now, under the ‘Manually Back Up and Restore’, click on ‘Back Up Now’ button to start the backup process. (Step 3 as shown in the image below)
- iTunes will start the sync and backup process of your iPhone on your computer to update or the create iTunes backup file for your iPhone. A progress indicator will show up in iTunes while the backup is being created.

Create iTunes Backup
If you wish to extract and recover iPhone data to your computer, you can use the Total Saver backup recovery software. It is compatible both with Mac and Windows computers. In case you wish to extract and recover encrypted iPhone data, use the Total Saver Pro encrypted backup recovery software on your computer.

Pingback: How to Backup WhatsApp Messages and Data
Pingback: How to Recover Deleted iPhone Photos
Pingback: Save iPhone Text Messages
Pingback: Recover iPhone Photos from iTunes backup
Pingback: Download iPhone Text Messages
Pingback: Print iPhone text messages
Pingback: Recover iPhone text messages from iCloud